In order to bring this recipe into fruition, I envisioned all of the typical components that make for an incredible flan, such as a silky and smooth texture and decadent flavor without being overwhelming eggy. Moreover, since this would be a corn flan, the corn flavor also needed to be well-balanced. The secondary step, then, was to dissect the ways we think about and consume the anatomy of the corn.
In walking through the frozen section of your local supermarket, there would most likely be bags of frozen corn kernels or frozen corn cobs, with the husks and silks removed at your convenience. If there is fresh corn, there may even be a trashcan available nearby to throw away the husks and silks. Whether purposefully or not, we are conditioned to think of corn in a dichotomy: its most edible part, that being the kernel, versus its most inedible parts, that being the husks, silks, and cob. Thinking of the consumption of corn in this way inevitably shifted what came out of this recipe. Now, the goalpost was to create a recipe in which no part of the corn was discarded and, instead, extracted the flavor from each part of the corn to enhance the overall taste of the flan. With this in mind, I borrowed the technique of roasting the husks from Isabel Coss’s–a Mexican pastry chef based in D.C.–corn flan recipe, which is linked here.
Ultimately, I was very successful in developing a corn flan that met the criteria I had initially envisioned. The flan has a silky and luxurious texture, where neither the egg nor corn is too pronounced. But as the goalposts shifted in the recipe development process, so did the perception of feeling as though I was out of my depth. Regardless of these feelings, I maintained that the skill sets I already had were enough to see this recipe through while simultaneously remaining open to the learning opportunities that would arise out of the mistakes I would likely make. Although the eggs never curdled and the flan never over baked, the recipe still needed to be tweaked a few more times. What arose from the recipe development process were the parallels between waste and disposability within food consumption and mistake-making.
The hastiness in which we dispose of the seemingly inedible components of an ingredient, such as a corn’s husks, silks, and cob, mirrors the eagerness in which we hide our mistakes in secrecy and shame. Just as we assume that the parts of food that are inedible are therefore completely useless, we also reason that parts of ourselves that are the hardest to digest should be disposed of, never to be looked at or processed again. Similarly, the recipe development process is not merely a means to produce the best recipe possible. Within the process, there are a thousand different ways to arrive at the same product, with a million more ways to make mistakes along the way. As such, the meaning of recipe development is that it is first and foremost an exercise in understanding that mistakes are conduits of growth. It is a process that should be equally concerned about creating a memorable dessert as it is about understanding that no mistake, big or small, should be discarded, overlooked, or disposed of. It is through constructive criticism that the discovery of and correction of errors is possible, and consequently, this creates space for the continued growth of skills and imagination.
Most people would define recipe development as the process of creating a recipe, for various reasons, that appeals to a wide audience. Defining recipe development in this way, however, blurs and dismisses the invaluable experiences that the process in its entirety, including the failed recipes, present. It is easy to conceal one’s mistakes behind the finished product or the beautifully staged pictures of food that are usually paired alongside a published recipe. Likewise, it is easy to alienate the produce or ingredients that we see at the supermarket, a published recipe, or the people we interact with from the processes that make them whole. The process of developing a recipe is not about ease. It is the active development of one’s culinary skill and flavor imagery through a creative process and the ability to transcend the importance of such practice and discipline to a wider audience. In the end, this corn flan recipe was a lesson of learning how to use all the parts that an ingredient has to offer in tandem with embracing mistakes, even when it seems like it is much easier to shuck and discard these pillars of development.


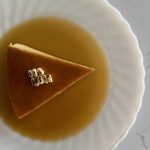
Corn Flan
Ingredients
For the corn milk:
- 2 ears of yellow corn including husks and silks
- 2 cups whole milk
- (1) 12 oz. can evaporated milk
For the caramel:
- 1 cup granulated sugar
For the corn flan:
- 5 large eggs room temperature
- 3 large egg yolks room temperature
- (1) 14 oz. can sweetened condensed milk
- 1 tbsp vanilla paste or vanilla extract
- ½ tsp kosher salt
Instructions
For the corn milk:
- Preheat the oven to 300°F. Husk the corn, reserving the husk of one corn and the silks of each corn.
- Prepare a baking sheet with parchment paper and arrange the husks onto the sheet in a single layer. Roast the husks for 1 hour and 10 minutes, or until the husks are evenly browned and completely dry.
- Cut the kernels from the cob and reserve both the cobs and kernels.
- To a medium-sized pot, add the whole milk and evaporated milk and stir. Then, add roasted husks, cobs, kernels, and corn silk to the milk.
- Over medium-low heat, cook the corn for 15 to 20 minutes, stirring frequently, until tender. Do not boil the milk!
- Remove the pan from the heat, cover, and allow the ingredients to steep in the milk for 1 hour. As the milk infuses, make the caramel.
For the caramel:
- To a saucepan with high sides, add the sugar in an even layer. Ensure that the saucepan is completely dry before adding the sugar to prevent it from crystallizing.
- Over medium heat, caramelize the sugar while constantly stirring with a heatproof spatula or wooden spoon. As the sugar caramelizes, it will clump up. Continue to stir until the sugar reaches an amber color, like that of a penny, and all of the sugar has completely dissolved.
- Immediately pour the caramel into a 9” cake pan. The caramel will cause the sides of the pan to become hot. As such, use oven mitts to swirl the caramel around to create an even layer of the caramel. Set aside.
For the corn flan:
- Preheat the oven to 350°F and boil a pot of water.
- When the milk has been steeped, lift the lid at a straight angle from the pot to avoid the condensed water from falling into the milk.
- Remove the husks, cobs, and corn silk from the milk.
- Transfer the milk and the kernels to a blender and blend until smooth. Set aside.
- To a large bowl, whisk the eggs and yolks until well combined.
- Add the condensed milk, vanilla paste, and salt. Whisk until the ingredients are all cohesive.
- Place a fine mesh strainer over the bowl and pour the corn milk over the strainer. Use a rubber spatula to push through any of the remaining milk caught in between the corn skins.
- Pour the flan base into the 9” cake pan and gently tap against a work surface to get rid of the bubbles, if any.
- Cover tightly with aluminum foil and place the flan in a roasting pan that’s large enough for a water bath. Pour enough boiling water to submerge the bottom half of the cake pan.
- Bake the flan for 1 hour or until a knife inserted in the middle comes out clean. The flan should be jiggly but firm.
- Carefully remove the flan from the water bath and allow it to cool, covered, for 30 minutes. Then, place the flan in the fridge for at least 6 hours, but ideally, overnight.
- Before serving, run a blunt knife around the outermost edges of the flan so that it will easily unmold onto your desired serving platter.
Notes
Enjoy! <3

Leave a Reply